

Hi guys!
Knowing how to apply eye shadow properly to your eyes depends on your eye shape. Most common makeup mistakes are made by those that have hooded or folded eyelids. If that’s you, I must say it doesn’t come naturally to know how to do it. It’s something you have to research and experiment with. Your goal in eye shadow application is to lift the eyes up and draw attention away from the hooded area. Below you’ll find a step-by-step guide on just how to achieve that! If you’re not sure what your eye shape is, check out this chart:

photo: pinterest
1. Apply Eyeliner To Upper Lash Line

photo: paulaschoice.com
The very first step is to apply black eyeliner to your upper lash line as close to your roots as possible. This will open up your eyes and make your lashes appear fuller. It will also aid in your eye shadow placement.
2. Curl Lashes & Apply Mascara

photo: traviasuite.com
This step seems backwards, but it makes a big difference! Before applying eye shadow, curl your lashes and apply a light coat of mascara. Doing this first will open up the eyes and provide a guideline of where to apply eye shadow.
3. Apply Shimmer Eye Shadow To Visible Lid Only

photo: aliceintheunderland.blogspot.com
Avoid shimmery or glitter shadows on the crease to minimize focus on the hooded area. Only apply shimmer shadow to the visible lid. If you don’t like shimmer shadows, apply a shadow that is one to two shades darker than your natural skin tone to the visible lid. For the brow bone, it’s okay to apply a thin amount of shimmer shadow directly under the brow. But avoid applying too much because it will only accentuate the hooded appearance.
This is what you want don’t want to do:

photo: ensecrets.com
4. Apply Matte Eye Shadow To Hooded Area

photo: tumblr
Using a crease or blending brush, apply a matte shadow one or two shades darker than your skin tone all over the hooded area (i.e. the fold), from outer to inner corner. Also apply this shade to the area on your eyelid that is not visible (opposite of the shimmery shade placement). As a result, the lid will recede and appear less hooded. If you would like to add darker matte shadows, only apply them to the outside corner of the eye and outer “V”. With a blending brush, blend the color up into the lighter matte shadow to create more of a smokey look.
I personally love the “Straight Line Technique”:
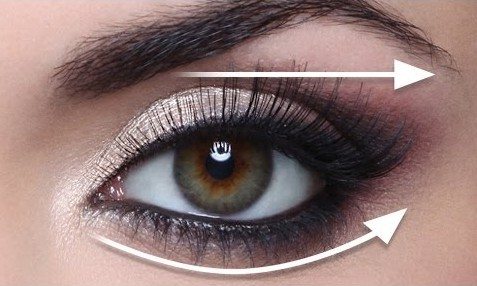
photo: Wayne Goss
Apply the shadow on your hooded area in a straight line as seen in the photo. Conversely on the lower lash line, apply the shadow thinner on the ends and thicker in the middle. The result is a more lifter appearance and minimizing the droopy appearance. Check out YouTube beauty guru, Wayne Goss’s tutorial on how to use this technique.
5. Apply Eye Shadow To The Lower Lash Line
Hooded or folded eyes really benefit from a well-defined lower lash line as well. Apply the mid-tone shadow to your entire lash line, then follow with the darker shade from the outer corner half way towards the inner corner.
One of my favorite YouTubers, Sona Gasparian of Simply Sona, has a very helpful tutorial for my more visual babes. She lays it out perfectly!
General Tips:
- Avoid dragging the tail of your eyebrows down either as a result of grooming or with makeup because this will make your eyes appear more droopy. Instead, define the top of your brow arch with your favorite brow product to draw the eyes up.
- Always blend out the edges of your shadows to avoid harsh lines.
- If you are a lover of false lashes, use wispy styles that grow from short to long. This will elongate your eyes and draw them up.
- You can most definitely wear a winged liner! Just make sure to avoid applying a thick amount on your lash line (watch the tutorial above).
- Tightline your upper lash line i.e. apply black eyeliner to your upper waterline. Seems scary but also aids in opening up the eyes.
- Tighline your lower waterline with a flesh tone eyeliner to open the eyes even more.
- Experiment and have fun!
There are no rules and you can do whatever you like! But if you’re looking for more guidance, these makeup tips will definitely help you compliment hooded or folded eye shapes. Please leave any comments or questions below and also include any tips that you have! xo Sarah

2 Comments
These are great! Thank you
You’re so welcome!